Hey there, folks! Got a leaky toilet driving you up the wall? Don’t sweat it, I’ve got your back. Today, we’re gonna talk about how to replace that pesky seal under your throne in just a few simple steps. So grab your tools and let’s get down to business!
Gather Your Gear and Prep Yourself
First things first, before diving into this DIY adventure, make sure you have all the necessary gear at hand. You’ll need some rubber gloves (trust me on this one), an adjustable wrench or pliers, a putty knife or scraper, and of course, a new wax ring seal.
Now that you’re geared up like a pro plumber (well almost), turn off the water supply valve located behind your toilet. Give it a good clockwise twist until it stops flowing water into the tank. Flush once or twice to drain out any remaining water from the bowl.
Bid Farewell to the Old Seal
This is where things get real interesting! Grab hold of those trusty pliers or wrench and start loosening those nuts securing your toilet bolts on each side of its base. Once they’re loose enough, carefully lift off the entire toilet from its position.
You might wanna place some old towels nearby because there could be some residual water left in there – nobody wants an unexpected wet surprise! Now take that putty knife or scraper and gently scrape away any remnants of wax from both the flange (the pipe sticking outta’ floor) and bottom of your porcelain throne.
Hello There New Wax Ring!
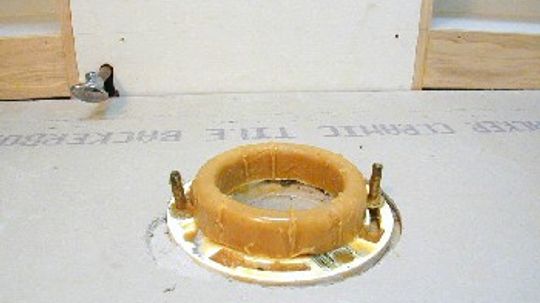
All righty then! It’s time for our star player – introducing Mr. Wax Ring! Take that shiny new wax ring seal and place it directly on top of the flange. Make sure it’s centered properly, so your toilet sits nice and snug once we put it back in place.
Now comes the fun part – lowering your throne back onto its rightful spot. Carefully align those bolts with the holes at the base of your toilet and gently press down until you feel a firm connection. Give it a little wiggle to ensure everything is sitting pretty.
The Final Touches
We’re almost there, my friend! Now tighten up those nuts on each side of the base using your trusty pliers or wrench. Don’t go Hulk-style though; just give ’em a good snug without overdoing it – we don’t want any cracked porcelain situations here!
Once you’ve got those nuts tightened up, turn that water supply valve counterclockwise to let the water flow into your tank again. Keep an eye out for any leaks around the base as you do this – if all looks dry and dandy, congratulations! You’ve successfully replaced that troublesome seal under your toilet!
In Conclusion
There you have it, folks – a step-by-step guide to replacing that leaky seal like a boss! Remember, tackling these DIY projects can be both rewarding and cost-effective. Just make sure to take necessary precautions along the way (like wearing gloves) and don’t hesitate to call in professional help if things get too hairy.


